Tutorials: SMS Setup
Required access: VitalPBX, Voxtelesys Portal
In this tutorial, we will go over setting up and using Voxtelesys SMS services with VitalPBX.
Setting up SMS with Voxtelesys is easy! If you do run into any issues you can reach out to Voxtelesys Support. During the setup you will be working in the Voxtelesys Portal and VitalPBX UI. If possible, it is best to have both pages up as you will copy and paste the API Keys, Webhooks, etc.
*Disclaimers: When this tutorial was created, only VitalPBX Connect app was supported for messaging.
It is important to note that MMS is currently not supported on VitalPBX.
Last Updated: 9/10/2025

Before we begin, you will want to make sure your license supports the SMS integration and the package is added to your PBX. Verify your license with VitalPBX Sales.
To add the SMS package in VitalPBX go to Admin > Add-ons > Install SMS
First, you will want to create the messaging provider in VitalPBX.

Click on the "PBX" icon, then click on the "SMS" tab.
Select "Messaging Providers" from the drop-down menu.

Select Voxtelesys from the drop-down menu and give it a description.
Leave this page open as we will need to create and copy the API key from the Voxtelesys Portal.
Navigate to the Voxtelesys Portal.
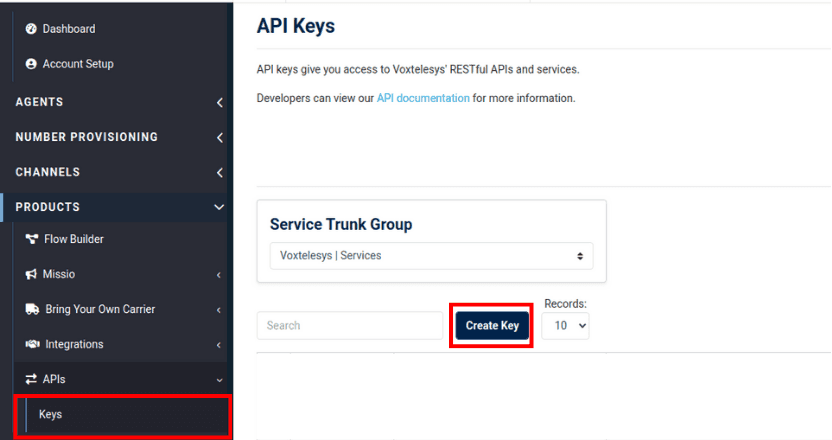
In the "Products" category, click on the "APIs" tab, then select "Keys" from the drop-down menu.
Click on "Create Key."

Make sure you enable the key, give it a name to make it easy to identify and select the Trunk Group.

Use the Copy button to copy your key to your clipboard.
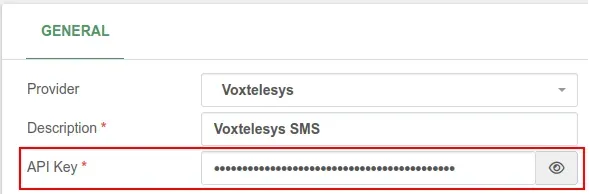
With the API key copied, navigate back to VitalPBX and paste it into your Voxtelesys Messaging Provider setup.
Save and reload VitalPBX when you are finished.

Now that the Messaging Provider is built in VitalPBX, we can use the Webhook they generated to create our Messaging Application in the Voxtelesys Portal.
From the Voxtelesys Messaging Provider template on VitalPBX, copy the Webhook URL.
Navigate back to the Voxtelesys Portal to start building the Messaging Application.
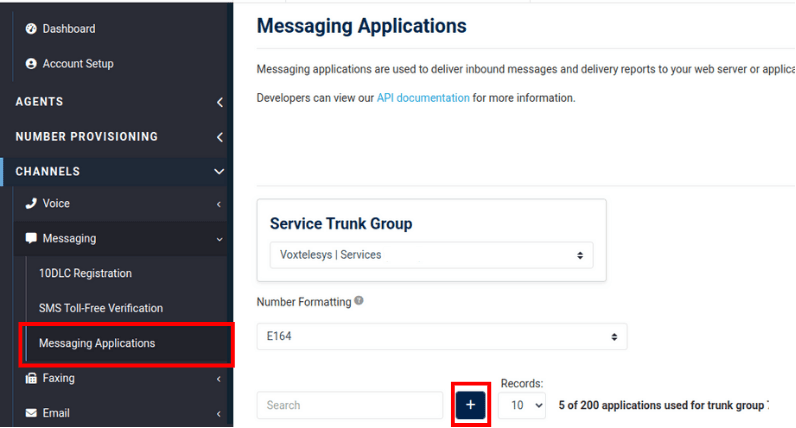
Go to the "Channels" category, click on the "APIs" tab, then select "Messaging Applications" from the drop-down menu.
Click on the "Create Application" button.

Profile Name: Name your Messaging Application.
Trunk Group: Select your SIP Trunk.
Action Type: Select “Send HTTP Callback."
HTTP Method: Select the POST method.
Events: Both
MO Webhook: This is the Webhook URL from VitalPBX.
Save and reload VitalPBX when you are finished.
DR Webhook: This is the Webhook URL from VitalPBX.
Authentication: Set it to "None."
Click “Confirm” when you are finished.
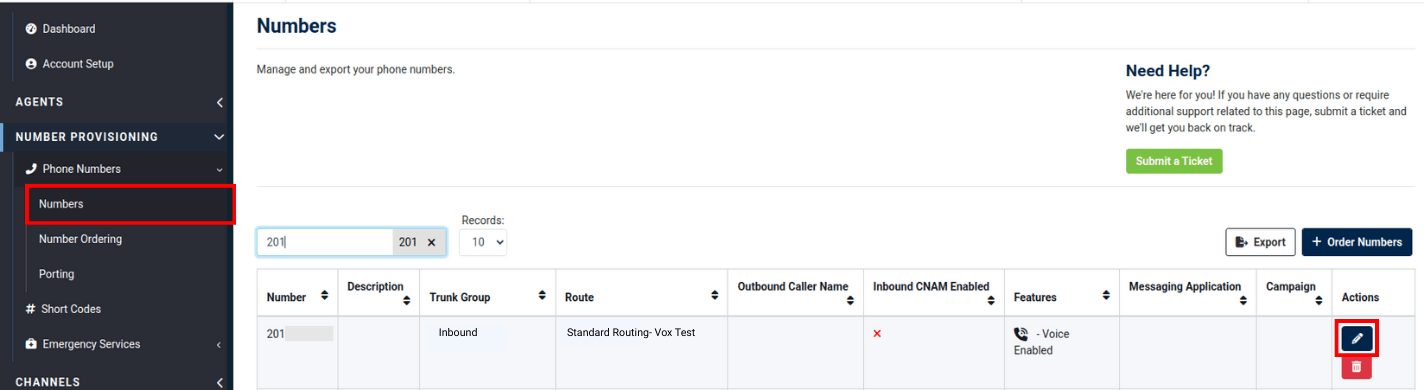
Edit the Number you Want to SMS Enable.
Go to Number Provisioning > Phone Numbers > Numbers > Find and edit the number.

If you do not have a Campaign you can select “None - Surcharges Apply.” If you have any issues with message delivery, we will be unable to troubleshoot without a campaign approved and assigned. To create a campaign you can do so here.

Select the following:
SMS Enabled: Check SMS Enabled
Service Trunk: Select your Service Trunk from the drop down.
Messaging Application: Select your Messaging Application from the drop down.
Campaign: Select your Campaign from the drop down.
Click "Confirm" when you are finished.
Almost done! All we need to do now is add the SMS numbers to VitalPBX, this can be done two ways:

On VitalPBX in the Messaging Provider section, click on the "Add Number" button.
VitalPBX supports SMS in E164 formatting. Make sure the numbers are setup in VitalPBX as E164 and make sure that your Messaging Application and Inbound Trunk on Voxtelesys are both setup as E164.

Add the number using E164 formatting.

On VitalPBX in the Messaging Provider, click on the "Get Numbers from API" button.

Click on the "Continue" button.
Make sure the SMS number is Assigned to the user/extension.
Inbound SMS follows your inbound rules.
You can check SMS logs on VitalPBX to help troubleshoot your incoming messages. We have SMS logs on our Portal.

That’s it! SMS integration between Voxtelesys and VitalPBX is now complete.


